HTTP Server
2025/02/12 更新
本篇文章我们将详细介绍如何在W55MH32芯片上面实现HTTP Server功能,并通过实战例程,为大家讲解如何通过浏览器修改W55MH32的网络地址信息。
该例程用到的其他网络协议,例如DHCP, 请参考相关章节。有关 W55MH32 的初始化过程,请参考Network install,这里将不再赘述。
HTTP协议简介
HTTP(超文本传输协议,HyperText Transfer Protocol)是一种用于分布式、协作式、超媒体信息系统的应用层协议, 基于 TCP/IP 通信协议来传递数据,是万维网(WWW)的数据通信的基础。设计 HTTP 最初的目的是为了提供一种发布和接收 HTML 页面的方法,通过 HTTP 或者 HTTPS 协议请求的资源由统一资源标识符(Uniform Resource Identifiers,URI)来标识。 以上是HTTP协议的简介,如想深入了解该协议,请参考mozilla网站上的介绍:HTTP 概述-HTTP|MDN
HTTP协议特点
- 基于请求-响应模型:客户端发起请求,服务器处理后返回响应。例如,用户在浏览器输入网址时, 浏览器会向对应服务器发送HTTP请求,服务器返回网页内容。
- 无状态性: HTTP本身不保存请求之间的状态,每次请求独立。但可以通过Cookie、Session等机制实现状态保持。
- 无连接:无连接的含义是限制每次连接只处理一个请求。服务器处理完客户的请求并收到客户的应答后,便立即断开连接。
HTTP Server
W55MH32使用HTTP Server模式可以进行以下几种应用:
- 设备配置和管理: 通过浏览器访问W55MH32提供的WEB界面,实现网络配置,系统参数调整,固件升级等操作。
- 实时监控和数据展示:通过浏览器访问W55MH32提供的WEB页面,实时监控传感器数据,状态信息,以及查看工作日志等。
- 远程控制:通过浏览器访问W55MH32提供的WEB页面进行远程控制设备,如开关等。
HTTP协议的基本工作流程
HTTP的请求-响应模型通常由以下几个步骤组成
- 建立连接:客户端与服务器之间基于TCP/IP协议建立连接。
- 发送请求:客户端向服务器发送请求,请求中包含要访问的资源的 URL、请求方法(GET、POST、PUT、DELETE 等)、 请求头(例如,Accept、User-Agent)以及可选的请求体(对于 POST 或 PUT 请求)。
- 处理请求:服务器接收到请求后,根据请求中的信息找到相应的资源,执行对应的处理操作。 这可能涉及从数据库中检索数据、生成动态内容或者简单地返回静态文件。
- 发送响应:服务器将处理后的结果封装在响应中,并将其发送回客户端。响应包含状态码(用于指示请求的成功或失败)、 响应头(例如,Content-Type、Content-Length)以及可选的响应体(例如,HTML 页面、图像数据)。
- 关闭连接:在完成请求-响应周期后,客户端和服务器之间的连接将被关闭, 除非使用了持久连接(如 HTTP/1.1 中的 keep-alive)。
HTTP请求方法
在 HTTP协议中, GET和 POST是两种常用的请求方法, 用于客户端向服务器发送数据和获取资源。
GET 方法
GET方法通常用于从服务器获取资源。它有以下特点
- 参数传递: 请求参数通过URL中的查询字符串传递,形如?key1=value1&key2=value2。
- 数据大小限制:由于参数附加在URL后,长度可能受URL长度限制(取决于浏览器和服务器设置)。
- 安全性: 数据在URL中明文显示,不适合传递敏感信息。
请求格式:
GET <Request-URI> HTTP/<Version>
<Headers>
<Blank Line>
- Request-URI:表示目标资源的路径,可能包含参数。
- Version: HTTP协议版本。
- Headers:包含元信息,例如客户端的属性、支持的格式等。
- Blank Line:空行。
POST 方法
POST方法通常用于向服务器提交数据。它有以下特点:
- 参数传递:数据放在请求体中,而不是URL中。
- 数据大小限制: POST请求的体积没有明显限制,可以传递大量数据。
- 安全性: 数据在请求体中传输,相对来说更安全。
请求格式:
POST <Request-URI> HTTP/<Version>
<Headers>
<Blank Line>
<Body>
- Request-URI: 目标资源的路径,通常是API的端点。
- Headers: 元信息,例如内容类型和长度。
- Blank Line: 空行,区分头和主体。
- Body: 数据的主体,包含客户端发送到服务器的长度。
HTTP协议响应内容
HTTP协议响应内容包含状态行、响应头以及响应体三个部分。
状态行
HTTP 状态行包含HTTP协议版本、状态码以及状态描述。
状态码由三个十进制数字组成,第一个十进制数字定义了状态码的类型。
状态码分为五类:
- 1xx(信息性状态码): 表示接收的请求正在处理。
- 2xx(成功状态码):表示请求正常处理完毕。
- 3xx(重定向状态码):需要后续操作才能完成这一请求。
- 4xx(客户端错误状态码):表示请求包含语法错误或无法完成。
- 5xx(服务器错误状态码): 服务器在处理请求的过程中发生了错误。
HTTP/1.1 200 OK
响应头
响应头则会包含内容类型、长度、编码等信息。
常见的响应头字段有:
- Content-Type: 响应内容的MIME类型,例如 text/html、application/json。
- Content-Length: 响应内容的字节长度。
- Server: 服务器信息。
- Set-Cookie: Set-Cookie:
示例:
Content-Type: text/html; charset=UTF-8
Content-Length: 3495
Server: Apache/2.4.41 (Ubuntu)
响应体
响应体包含实际的数据内容,具体形式取决于响应的类型和请求内容。例如:HTML页面内容,JSON数据,文件的二进制数据等。
如果是状态码为204 No Content 或 304 Not Modified的响应,则通常没有正文。
请注意:
响应体和响应头之间会添加一个空行来分隔内容。
Web页面的基本构成
1.HTML(超文本标记语言)
作用:定义网页的结构和内容。
内容
- 结构标签:如 <html>、<head>、<body>。
- 内容标签:如 <h1>、<p>、<img>、<a>。
- 表单标签:如 <form>、<input>、<button>。
2.CSS(层叠样式表)
作用:控制网页的样式和布局。
内容:
- 字体设置:如 font-family、font-size。
- 颜色设置:如 color、background-color。
- 布局设计:如 margin、padding、display、flex。
- 响应式设计:如媒体查询(@media)。
3.JavaScript(脚本语言)
作用:增加网页的交互性和动态功能。
应用::
- 表单验证。
- 动画效果。
- 与服务器交互(如通过 AJAX 请求)。
- 处理用户事件(如点击、悬停)。
4.Meta 信息
作用:提供页面的元数据,通常包含在 <head> 中。
内容:
- 网页标题:<title>。
- 字符集:<meta charset="UTF-8>"。
- SEO 信息:如<meta name="description" content="描述">。
- 设备适配:如 <meta name="viewport" content="width=device-width, initial-scale=1.0>"。
示例:
<!DOCTYPE html>
<html lang="en">
<head>
<meta charset="UTF-8">
<meta name="viewport" content="width=device-width, initial-scale=1.0">
<title>Simple Page</title>
<style>
body { font-family: Arial, sans-serif; text-align: center; padding: 20px; }
button { padding: 10px 20px; cursor: pointer; }
</style>
</head>
<body>
<h1>Hello, Web!</h1>
<p>Click the button for a surprise.</p>
<button onclick="alert('You clicked the button!')">Click Me</button>
</body>
</html>
Web页面交互
1.HTTP 请求页面
描述::客户端通过 HTTP 协议向服务器发送请求,服务器处理后返回响应。
特点:
- 最基础的交互方式。
- 包括常见的 HTTP 方法:GET、POST、PUT、DELETE 等。
示例:
- GET 请求:浏览器访问网页,获取静态资源(HTML、CSS、JavaScript 等)。
- POST 请求:提交表单数据。
描述::通过 HTML 表单向服务器提交数据。
特点:
- 表单数据会被编码后随请求发送。
- 可使用 GET 或 POST 方法。
示例:
<form action="/submit" method="post">
<input type="text" name="username" placeholder="Enter your name">
<button type="submit">Submit</button>
</form>描述::使用 JavaScript 在后台与服务器通信,更新部分页面内容而无需刷新整个页面。
特点:
- 提高用户体验,减少页面加载时间。
- 现代开发中多用 JSON 代替 XML。
示例:
fetch('/api/data', {
method: 'GET'
})
.then(response => response.json())
.then(data => console.log(data));
Web服务器响应处理
1.直接响应
定义: 服务器直接处理请求,返回静态资源或简单的动态内容,而不调用外部脚本或程序。
特点
- 高效:直接处理请求,无需额外调用外部程序,适合静态内容。
适用场景:
- 静态资源(HTML、CSS、JavaScript、图像等)的分发。
- 轻量级动态内容生成。
工作流程
- 客户端发送 HTTP 请求。
- 服务器解析请求 URL,查找相应的资源(如文件路径)。
- 直接读取资源内容并返回给客户端,附加适当的 HTTP 响应头。
2.CGI 响应
定义: 服务器通过 CGI(Common Gateway Interface)调用外部程序或脚本,处理客户端请求并生成动态响应内容。
特点
- 灵活性: 可以动态生成内容,支持复杂逻辑。
适用场景:
- 动态内容生成(如用户登录、数据查询)。
- 与数据库交互或其他后台服务的复杂逻辑处理。
工作流程
- 客户端发送 HTTP 请求。
- 服务器解析请求并将请求数据(如 URL 参数或表单数据)传递给 CGI 程序。
- CGI 程序处理请求,生成响应内容并返回给服务器。
- CGI 程序生成的内容包装为 HTTP 响应发送给客户端。
实现过程
接下来,我们看看如何通过浏览器修改W55MH32的网络配置。
首先需要编写网页内容,这里我们写了一个网页配置页面的内容以及提交后等待重启页面的内容,如下所示:
#define index_page "<html>\n" \
"<head>\n" \
" <title>W55MH32 Configuration Page</title>\n" \
" <style>\n" \
" body { font-family: Arial, sans-serif; margin: 20px; padding: 20px; background-color: #f4f4f9; }\n" \
" h1 { text-align: center; color: #333; }\n" \
" form { max-width: 400px; margin: auto; background: #ffffff; padding: 20px; border-radius: 8px; box-shadow: 0 0 10px rgba(0, 0, 0, 0.1); }\n" \
" label { display: block; margin-bottom: 8px; font-weight: bold; }\n" \
" input[type=text], input[type=submit] { width: 400px; padding: 8px; margin-bottom: 12px; border: 1px solid #ccc; border-radius: 4px; }\n" \
" input[type=submit] { background-color: #4CAF50; color: white; border: none; cursor: pointer; }\n" \
" input[type=submit]:hover { background-color: #45a049; }\n" \
" input[readonly] { background-color: #e9ecef; color: #6c757d; border: 1px solid #ced4da; cursor: not-allowed; }\n" \
" .error { color: red; font-size: 12px; margin-top: -10px; margin-bottom: 10px; }\n" \
" input::placeholder { color: #aaa; font-style: italic; }\n" \
" </style>\n" \
" <script>\n" \
" function validateForm(event) {\n" \
" const ipPattern = /^(\\d{1,3}\\.){3}\\d{1,3}$/;\n" \
" let isValid = true;\n" \
" document.querySelectorAll('.error').forEach(e => e.textContent = '');\n" \
" const fields = ['ip', 'subnet', 'gateway', 'dns'];\n" \
" fields.forEach(field => {\n" \
" const input = document.forms[0][field];\n" \
" if (input.value.trim() === '') {\n" \
" input.placeholder = 'e.g., 192.168.1.1';\n" \
" document.getElementById(field + '-error').textContent = 'This field is required.';\n" \
" isValid = false;\n" \
" } else if (!ipPattern.test(input.value)) {\n" \
" document.getElementById(field + '-error').textContent = 'Invalid IP address format.';\n" \
" isValid = false;\n" \
" }\n" \
" });\n" \
" if (!isValid) {\n" \
" event.preventDefault();\n" \
" }\n" \
" }\n" \
" </script>\n" \
"</head>\n" \
"<body>\n" \
" <h1>W55MH32 Configuration Page</h1>\n" \
" <form method=\"post\" action=\"config.cgi\" onsubmit=\"validateForm(event)\">\n" \
" <label>MAC Address: </label><input type=\"text\" value=\"%s\" readonly><br>\n" \
" <label>IP Address: </label><input type=\"text\" name=\"ip\" placeholder=\"e.g., 192.168.1.1\" value=\"%s\"><div id=\"ip-error\" class=\"error\"></div><br>\n" \
" <label>Subnet Mask: </label><input type=\"text\" name=\"subnet\" placeholder=\"e.g., 255.255.255.0\" value=\"%s\"><div id=\"subnet-error\" class=\"error\"></div><br>\n" \
" <label>Default Gateway: </label><input type=\"text\" name=\"gateway\" placeholder=\"e.g., 192.168.1.1\" value=\"%s\"><div id=\"gateway-error\" class=\"error\"></div><br>\n" \
" <label>DNS Server: </label><input type=\"text\" name=\"dns\" placeholder=\"e.g., 8.8.8.8\" value=\"%s\"><div id=\"dns-error\" class=\"error\"></div><br>\n" \
" <input type=\"submit\" value=\"Submit\">\n" \
" </form>\n" \
"</body>\n" \
"</html>\n"这里,我们提交网络地址信息的方式为POST,提交的地址为config.cgi:
#define CONFIG_SUCCESS_PAGE                                                                               \
"<!DOCTYPE html>\n"                                                                                   \
"<html lang=\"en\">\n"                                                                                \
"<head>\n"                                                                                            \
"    <meta charset=\"UTF-8\">\n"                                                                      \
"    <meta name=\"viewport\" content=\"width=device-width, initial-scale=1.0\">\n"                    \
"    <title>Configuration Modification Succeeded</title>\n"                                           \
"    <style>\n"                                                                                       \
"        body {\n"                                                                                    \
"            font-family: Arial, sans-serif;\n"                                                       \
"            text-align: center;\n"                                                                   \
"            padding-top: 100px;\n"                                                                   \
"            background-color: #f0f0f0; \n"                                                           \
"        }\n"                                                                                         \
"        h1 {\n"                                                                                      \
"            color: green;\n"                                                                         \
"            animation: fadeInOut 2s infinite;\n"                                                     \
"        }\n"                                                                                         \
"        #countdown {\n"                                                                              \
"            font-size: 24px;\n"                                                                      \
"            margin-top: 20px;\n"                                                                     \
"            opacity: 0; \n"                                                                          \
"            animation: fadeIn 1s forwards;\n"                                                        \
"            animation-delay: 1s; \n"                                                                 \
"        }\n"                                                                                         \
"        @keyframes fadeIn {\n"                                                                       \
"            from {\n"                                                                                \
"                opacity: 0;\n"                                                                       \
"            }\n"                                                                                     \
"            to {\n"                                                                                  \
"                opacity: 1;\n"                                                                       \
"            }\n"                                                                                     \
"        }\n"                                                                                         \
"    </style>\n"                                                                                      \
"</head>\n"                                                                                           \
"<body>\n"                                                                                            \
"    <h1>Configuration Modification Succeeded!</h1>\n"                                                \
"    <p id=\"countdown\">Will redirect in 10 seconds. Please wait...</p>\n"                           \
"<script>\n"                                                                                          \
"        let seconds = 10;\n"                                                                         \
"        const countdownElement = document.getElementById('countdown');\n"                            \
"        const countdownInterval = setInterval(() => {\n"                                             \
"            seconds--;\n"                                                                            \
"            countdownElement.textContent = `Will redirect in ${seconds} seconds. Please wait...`;\n" \
"            if (seconds === 0) {\n"                                                                  \
"                clearInterval(countdownInterval);\n"                                                 \
"                window.location.href = 'http://%d.%d.%d.%d/';\n"                                     \
"            }\n"                                                                                     \
"        }, 1000);\n"                                                                                 \
"</script>\n"                                                                                         \
"</body>\n"                                                                                           \
"</html>"
步骤1:从EEPROM中读取网络地址信息并配置
check_eeprom_network_info(&default_net_info);
network_init(ethernet_buf, &default_net_info);
check_eeprom_network_info()函数的作用是检查EEPROM中是否有网络地址信息,如果有则赋值给default_net_info结构体。函数内容如下:
uint8_t check_eeprom_network_info(wiz_NetInfo *net_info)
{
  wiz_NetInfo eeprom_net_info = {0};

  /*-----------------------------------------------------------------------------------*/
  if (ee_CheckDevice(EEPROM_DEV_ADDR) == 1)
  {
      /* No EEPROM detected */
      printf("No serial EEPROM detected!\r\n");

      return 0;
  }
  ee_ReadBytes((uint8_t *)&eeprom_net_info, 0, sizeof(eeprom_net_info));
  if (eeprom_net_info.mac[0] == 0x00 && eeprom_net_info.mac[1] == 0x08 && eeprom_net_info.mac[2] == 0xdc)
  {
      memcpy(net_info, &eeprom_net_info, sizeof(wiz_NetInfo));
      return 1;
  }
  return 0;
}
步骤2:注册网页内容及HTTP Server初始化
printf("Please enter% d.% d.% d.% d in your browser to access the %s HTTP server\r\n", net_info.ip[0], net_info.ip[1], net_info.ip[2], net_info.ip[3], _WIZCHIP_ID_);

sprintf(mac, "%02X:%02X:%02X:%02X:%02X:%02X", net_info.mac[0], net_info.mac[1], net_info.mac[2], net_info.mac[3], net_info.mac[4], net_info.mac[5]);
sprintf(ip, "%d.%d.%d.%d", net_info.ip[0], net_info.ip[1], net_info.ip[2], net_info.ip[3]);
sprintf(sn, "%d.%d.%d.%d", net_info.sn[0], net_info.sn[1], net_info.sn[2], net_info.sn[3]);
sprintf(gw, "%d.%d.%d.%d", net_info.gw[0], net_info.gw[1], net_info.gw[2], net_info.gw[3]);
sprintf(dns, "%d.%d.%d.%d", net_info.dns[0], net_info.dns[1], net_info.dns[2], net_info.dns[3]);
sprintf(page, (char *)index_page, mac, ip, sn, gw, dns);

reg_httpServer_webContent((uint8_t *)"index.html", (uint8_t *)page);         // Build HTTP server web pages
httpServer_init(http_tx_ethernet_buf, http_rx_ethernet_buf, 1, socknumlist); // Initializing the HTTP server
reg_httpServer_webContent()函数的作用是注册web内容,这里可以是页面,也可以是JavaScript代码。
httpServer_init的作用是初始化HTTP Server参数,四个参数分别是HTTP发送缓存、HTTP接收缓存、使用的SOCKET数量以及对应的SOCKET列表。
步骤3:注册HTTP超时中断程序
/**
* @brief   1ms timer IRQ Handler
* @param   none
* @return  none
*/
void TIM3_IRQHandler(void)
{
  static uint32_t tim3_1ms_count = 0;
  if (TIM_GetITStatus(TIM3, TIM_IT_Update) != RESET)
  {
      tim3_1ms_count++;
      if (tim3_1ms_count >= 1000)
      {
          DHCP_time_handler();
          httpServer_time_handler();
          tim3_1ms_count = 0;
      }
      TIM_ClearITPendingBit(TIM3, TIM_IT_Update);
  }
}
步骤4:运行HTTP Server程序
while (1)
{
    httpServer_run(SOCKET_ID);
}
httpServer_run()函数的逻辑跟TCP Server基本一致,也是运行了一个状态机,根据SOCKET不同状态,执行相应的HTTP Server部分的处理,内容如下:
void httpServer_run(uint8_t seqnum)
{
  uint8_t  s; // socket number
  uint16_t len;
  uint32_t gettime = 0;

#ifdef _HTTPSERVER_DEBUG_
  uint8_t destip[4] = {
      0,
  };
  uint16_t destport = 0;
#endif

  http_request        = (st_http_request *)pHTTP_RX; // Structure of HTTP Request
  parsed_http_request = (st_http_request *)pHTTP_TX;

  // Get the H/W socket number
  s = getHTTPSocketNum(seqnum);

  /* HTTP Service Start */
  switch (getSn_SR(s))
  {
  case SOCK_ESTABLISHED:
      // Interrupt clear
      if (getSn_IR(s) & Sn_IR_CON)
      {
          setSn_IR(s, Sn_IR_CON);
      }

      // HTTP Process states
      switch (HTTPSock_Status[seqnum].sock_status)
      {
      case STATE_HTTP_IDLE:
          if ((len = getSn_RX_RSR(s)) > 0)
          {
              if (len > DATA_BUF_SIZE) len = DATA_BUF_SIZE;
              len = recv(s, (uint8_t *)http_request, len);

              *(((uint8_t *)http_request) + len) = '\0';

              parse_http_request(parsed_http_request, (uint8_t *)http_request);
#ifdef _HTTPSERVER_DEBUG_
              getSn_DIPR(s, destip);
              destport = getSn_DPORT(s);
              printf("\r\n");
              printf("> HTTPSocket[%d] : HTTP Request received ", s);
              printf("from %d.%d.%d.%d : %d\r\n", destip[0], destip[1], destip[2], destip[3], destport);
#endif
#ifdef _HTTPSERVER_DEBUG_
              printf("> HTTPSocket[%d] : [State] STATE_HTTP_REQ_DONE\r\n", s);
#endif
              // HTTP 'response' handler; includes send_http_response_header / body function
              http_process_handler(s, parsed_http_request);

              gettime = get_httpServer_timecount();
              // Check the TX socket buffer for End of HTTP response sends
              while (getSn_TX_FSR(s) != (getSn_TxMAX(s)))
              {
                  if ((get_httpServer_timecount() - gettime) > 3)
                  {
#ifdef _HTTPSERVER_DEBUG_
                      printf("> HTTPSocket[%d] : [State] STATE_HTTP_REQ_DONE: TX Buffer clear timeout\r\n", s);
#endif
                      break;
                  }
              }

              if (HTTPSock_Status[seqnum].file_len > 0)
                  HTTPSock_Status[seqnum].sock_status = STATE_HTTP_RES_INPROC;
              else
                  HTTPSock_Status[seqnum].sock_status = STATE_HTTP_RES_DONE; // Send the 'HTTP response' end
          }
          break;

      case STATE_HTTP_RES_INPROC:
          /* Repeat: Send the remain parts of HTTP responses */
#ifdef _HTTPSERVER_DEBUG_
          printf("> HTTPSocket[%d] : [State] STATE_HTTP_RES_INPROC\r\n", s);
#endif
          // Repeatedly send remaining data to client
          send_http_response_body(s, 0, http_response, 0, 0);

          if (HTTPSock_Status[seqnum].file_len == 0) HTTPSock_Status[seqnum].sock_status = STATE_HTTP_RES_DONE;
          break;

      case STATE_HTTP_RES_DONE:
#ifdef _HTTPSERVER_DEBUG_
          printf("> HTTPSocket[%d] : [State] STATE_HTTP_RES_DONE\r\n", s);
#endif
          // Socket file info structure re-initialize
          HTTPSock_Status[seqnum].file_len    = 0;
          HTTPSock_Status[seqnum].file_offset = 0;
          HTTPSock_Status[seqnum].file_start  = 0;
          HTTPSock_Status[seqnum].sock_status = STATE_HTTP_IDLE;

//#ifdef _USE_SDCARD_
//					f_close(&fs);
//#endif
#ifdef _USE_WATCHDOG_
          HTTPServer_WDT_Reset();
#endif
          http_disconnect(s);
          break;

      default:
          break;
      }
      break;

  case SOCK_CLOSE_WAIT:
#ifdef _HTTPSERVER_DEBUG_
      printf("> HTTPSocket[%d] : ClOSE_WAIT\r\n", s); // if a peer requests to close the current connection
#endif
      disconnect(s);
      break;

  case SOCK_CLOSED:
      if (reboot_flag)
      {
          NVIC_SystemReset();
      }
#ifdef _HTTPSERVER_DEBUG_
      printf("> HTTPSocket[%d] : CLOSED\r\n", s);
#endif
      if (socket(s, Sn_MR_TCP, HTTP_SERVER_PORT, 0x00) == s) /* Reinitialize the socket */
      {
#ifdef _HTTPSERVER_DEBUG_
          printf("> HTTPSocket[%d] : OPEN\r\n", s);
#endif
      }
      break;

  case SOCK_INIT:
      listen(s);
      break;

  case SOCK_LISTEN:
      break;

  default:
      break;

  } // end of switch

#ifdef _USE_WATCHDOG_
  HTTPServer_WDT_Reset();
#endif
}
步骤5:请求内容处理
POST方式的CGI请求处理,在httpUtil.c文件的predefined_set_cgi_processor()函数中处理。
GET方式的CGI请求处理,在httpUtil.c文件的predefined_get_cgi_processor()函数中处理。
uint8_t predefined_set_cgi_processor(uint8_t *uri_name, uint8_t *uri, uint8_t *buf, uint16_t *len)
{
  if (strcmp((const char *)uri_name, "config.cgi") == 0)
  {
      uint8_t    *param;
      wiz_NetInfo new_net_info = {0};
      wizchip_getnetinfo(&new_net_info);

      param = get_http_param_value((char *)uri, "ip");        //获取IP地址
      parse_ip((char *)param, new_net_info.ip);               //更新IP地址
      param = get_http_param_value((char *)uri, "subnet");    //获取子网掩码
      parse_ip((char *)param, new_net_info.sn);               //更新子网掩码
      param = get_http_param_value((char *)uri, "gateway");   //获取默认网关
      parse_ip((char *)param, new_net_info.gw);               //更新默认网关
      param = get_http_param_value((char *)uri, "dns");       //获取DNS地址
      parse_ip((char *)param, new_net_info.dns);              //更新DNS地址

      new_net_info.dhcp = NETINFO_STATIC;
      ee_WriteBytes((uint8_t *)&new_net_info, 0, sizeof(wiz_NetInfo));
      reboot_flag = 1;
      *len        = sprintf((char *)buf, (char *)CONFIG_SUCCESS_PAGE, new_net_info.ip[0], new_net_info.ip[1], new_net_info.ip[2], new_net_info.ip[3]);
      return 1;
  }
  return 0;
}
步骤6:重启设备
在httpServer_run()函数中,当SOCKET处于SOCK_CLOSED状态时(即上次请求已经处理完毕),再进行复位操作, 避免出现客户端请求后,W55MH32未响应就重启导致客户端请求超时的情况。
case SOCK_CLOSED:
if (reboot_flag)
{
    NVIC_SystemReset();
}
运行结果
请注意:
测试实例需要PC端和W55MH32处于同一网段。
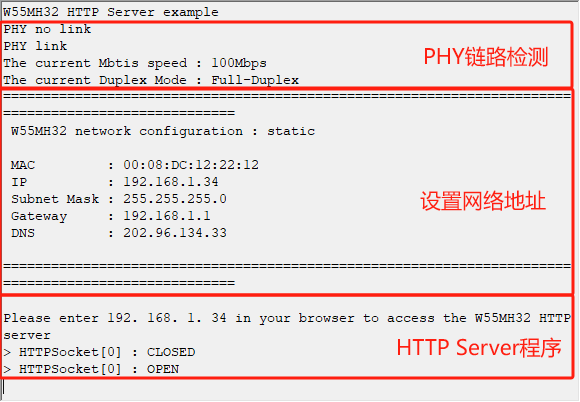
烧录例程运行后,首先进行了PHY链路检测,然后是通过DHCP获取网络地址并打印网络地址信息,
最后HTTP Server程序开始监听客户端的请求并处理响应,如下图所示:
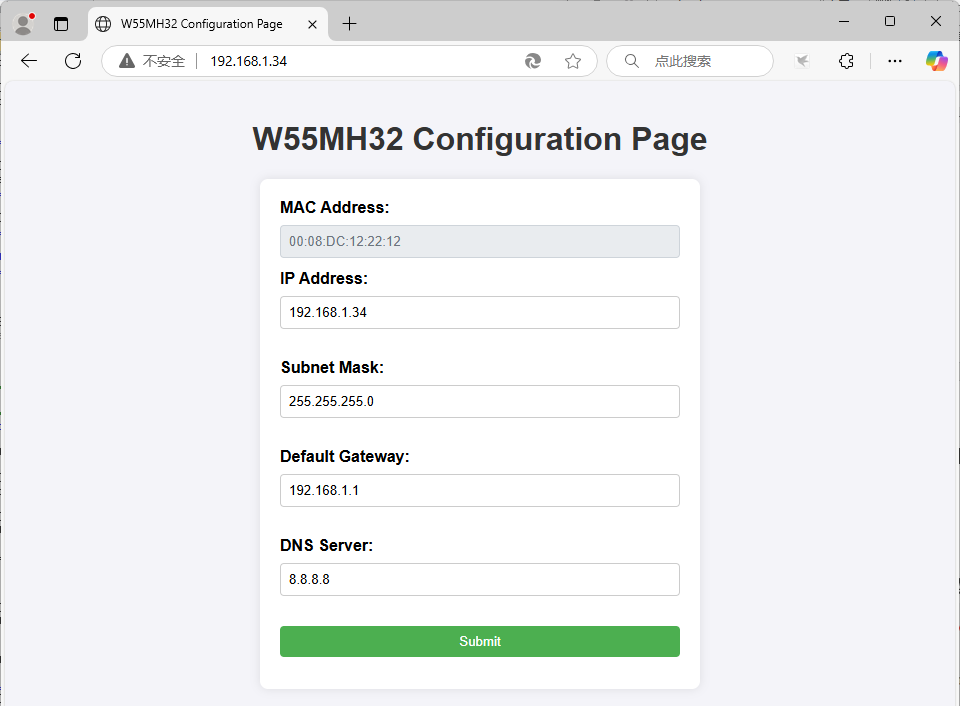
接着我们打开浏览器,输入W55MH32的IP地址进行访问。
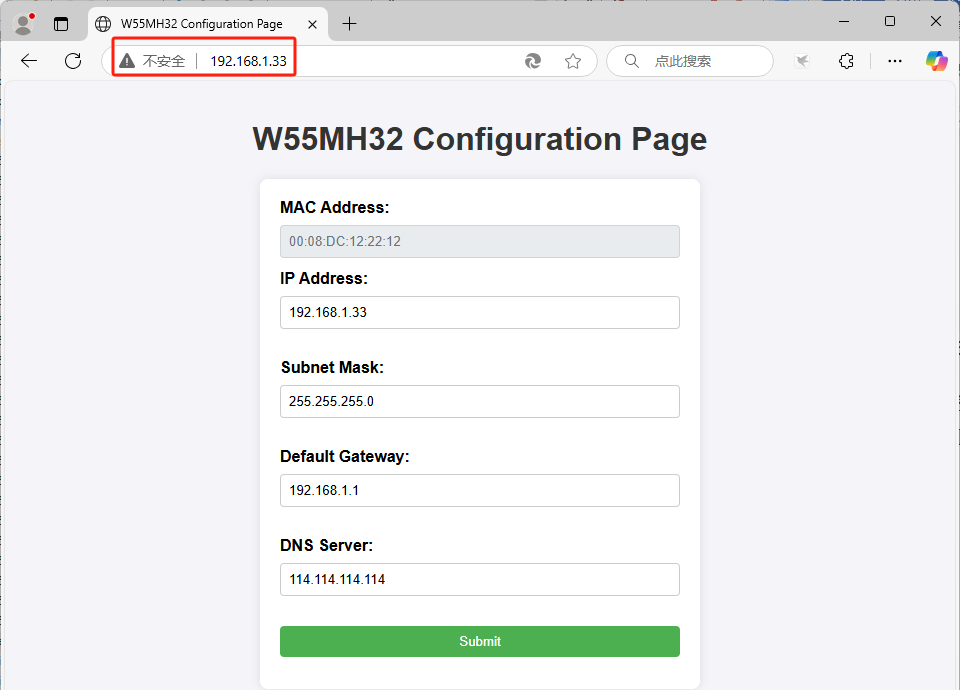
然后我们将IP地址改为192.168.1.33,DNS服务器地址改为114.114.114.114,并点击Submit按钮。 等待W55MH32重启后,浏览器会自动跳转至新地址。
总结
本文介绍了在 W55MH32 芯片上实现 HTTP Server 功能,并通过浏览器修改其网络地址信息的方法。 阐述了 HTTP 协议的概念、特点、应用场景、工作流程、请求方法、响应内容,以及 Web 页面构成和交互方式。展示了在W55MH32上实现的过程。 下一篇将讲解在该芯片上实现 SNTP 授时功能,介绍从 SNTP 服务器获取准确时间的原理和实现步骤。敬请期待!